Showing posts with label cooking. Show all posts

Thursday, 4 July 2013

Cheesy French toast bread pudding

The inspiration for this dish came from an old cookbook I stole from my Mum, "Take Three Cooks" by Nanette Newman, Emma Forbes and Sarah Standing. The original recipe is for a marmalade bread pudding, but they suggest the use of cheese for a savoury variation. Since my boyfriend is a huge fan of French toast, I thought I'd give it a go.

It's pretty easy to make, and would definitely pose a good alternative to traditional eggy bread if you were serving brunch to a crowd. The glorious combination of bubbling golden cheese and rich custard-soaked bread is incredibly good - comfort food at its best.

After...

The recipe doesn't call for any fancy ingredients - simply sliced bread, eggs, milk, cheese and butter. If you want to snazz it up, you could add some slices of ham between the slices of bread or spread one side of the bread triangles with mustard to give it an extra kick.

Ingredients (serves 2 - or one hungry boy. Double the recipe to feed a larger group)

4 slices of white bread (the original recipes suggests removing the crusts - I didn't bother)
25g spreadable butter
300ml milk
2 eggs, beaten
75g cheddar cheese
Salt and pepper, to taste

Method

Butter each slice of bread (on both sides if you're feeling especially decadent - I was lazy and just did one) and cut into triangles (two or four, again depending on how lazy you want to be when it comes to stacking them!). Layer the bread into the base of a greased ovenproof dish, topping each slice with cheese.

Before (not so pretty!)


Heat the milk in a pan until hot but not quite boiling. Pour the milk over your eggs, whisking as you pour. Season with salt and pepper, then pour the custard mixture over your bread and leave to soak for 10-15 minutes (or - more laziness - miss this step!).

Bake in a pre-heated oven at 200C for around 25 minutes (increase this to 30-40 if you have doubled the recipe) until your cheese is golden and bubbly and the custard is set. Serve piping hot.


Monday, 29 April 2013

An American feast: slow-cooked BBQ beans (with BBQ beef and sweet potato wedges)

I came across the recipe for the BBQ beans in Ina Garten's Barefoot Contessa at Home but was originally put off by the long cooking time. However, since I am now the proud owner of a slow-cooker, I decided to give it a go. It still requires a good bit of forward planning - you'll need to soak the dried kidney beans overnight, and cook them for 50 minutes on the stove before adding them to the dish - but it's a lot easier to throw everything into a slow-cooker and leave it to simmer than it is to spend 8 hours worrying about it drying out/spontaneously combusting in the oven.


Here's my version - I made a few minor adjustments to the ingredients (I skipped the tablespoon of Chinese chilli paste and added an extra tablespoon of grated ginger instead) and adapted it to be cooked in the slow-cooker.

Ingredients

1 pound dried red kidney beans
1 large onion
1 bay leaf
6 whole black peppercorns
175ml maple syrup (3/4 cup)
100g light brown sugar (1/2 cup, lightly packed)
125ml tomato ketchup (1/2 cup)
1(or 2) tablespoons freshly grated ginger
1 tablespoon of Chinese chilli paste
1 teapson salt
150g smoked bacon, diced

Soak the dried red kidney beans in a bowl of cold water overnight, making sure that the water covers the beans by at least an inch. Drain the beans and rinse well.

Cook the beans in a large pot with four pints (2.25l) of water, the onion (cut into eighths), bay leaf, and peppercorns.  Bring to the boil, then turn the heat down and simmer for 50 minutes, or until the beans are tender. Once the beans are cooked (a good trick is to take a scoopful of beans and blow on them - if the skins start to peel, they are ready), drain them, retaining the cooking liquid.


In a saucepan, whisk together the maple syrup, brown sugar, ketchup, chilli paste (if using), grated ginger, salt, and 375ml (1 1/2 cups) of the cooking liquid, reserving the remaining liquid. Simmer over a medium heat for around 6 minutes.

Transfer your beans to the slow cooker. Mix half the diced bacon into the beans, and place the rest on top. Pour the sweet sauce and 125ml (1/2 cup) of cooking liquid over the beans, and set the slow-cooker for 8 hours.

After 8 hours, transfer your beans to a heavy-based pot (I used my Le Creuset) and refrigerate until needed. When you're ready to use your beans, simmer on the stove top for a while to heat them through (and to thicken the sauce).

Sweet potato wedges - colourful and delicious
 
I served these beans alongside slow-cooked BBQ beef, sweet potato wedges and Cajun-spiced roast chicken as part of my American-themed dinner party.
 
Tasty, tasty BBQ beef

Friday, 22 March 2013

Haddock with a Philadelhia and king prawn topping

I adapted this dish from a recipe I found on the Philadelphia website, and it's my boyfriend's new favourite. Juicy haddock fillets are topped with a creamy mixture of diced king prawns, Philadelphia cheese, English mustard, white wine and lemon juice and baked in the oven for 15 minutes, before being finished off with a sprinkling of Parmesan and breadcrumbs and a final few minutes under the grill (for that lovely crisp crust).

This dish is healthy but satisfyingly rich, and goes perfectly with steamed vegetables and a big dollop of creamy mashed potato.


Ingredients

4 haddock fillets (or any other white fish) - around 500g
150g king prawns
2 tbsp Philadephia cream cheese
1 teaspoon English mustard
Dash of white wine
Squeeze of lemon juice
Salt and freshly ground black pepper, to taste
Parmesan cheese
Dried breadcrumbs
Grated mozzarella (optional - I had some in my fridge I wanted to use up, but it's just as good without)


Pre-heat the oven to 200C. Drizzle a non-stick baking tray with cooking oil, and place your four haddock fillets onto the tray. In a small bowl, combine the Philadelphia, English mustard, white wine, and lemon juice, and season to taste. Chop your king prawns into rough pices (around six per prawn) and stir into the cream cheese mixture.

Spread the cream cheese and prawn mixture onto your haddock fillets, and cook near the top of the pre-heated oven for 15 minutes. After this time, remove the fish from the oven and sprinkle with Parmesan and dried breadcrumbs (and grated mozzarella, if you fancy!), before cooking under the grill on high heat for a further 3 minutes or so, or until the cheese and breadcrumbs are golden and crispy.

Served with steamed vegetable and mashed potatoes.

Wednesday, 13 March 2013

Chicken breasts with creamy morel mushroom sauce and asparagus

One of my favourite dishes when I lived in Geneva as a teen was steak aux morilles: a thick slab of tasty meat in a creamy morel mushroom sauce, served with a tangle of spaghetti or tasty shoestring fries. Until recently I have never seen these tasty mushrooms sold in supermarkets, so I was delighted to find a packet of dried morels in the cooks section at Sainsbury's.


They aren't cheap - a 20g packet comes to around £7 - but they taste incredibly good, transforming an everyday meal into something really special. I served this sumptuous morel, cream, white wine and parmesan sauce with a bundle of asparagus, some gnocchi, and a couple of golden-seared chicken breasts, but it's just as tasty with steak, broccoli, spinach, potatoes, pasta.....so get creative!

Ingredients

Sauce

One packet of dried morel mushrooms (around 20g)
(if you can't find morels, you can use dried porcini mushrooms instead)
100ml single cream
Splash white wine
Parmesan
Freshly ground black pepper

Accompaniments

450g pack of chicken breasts (or steak)
Splash of cooking oil
Knob of butter
Bundle of asparagus (tenderstem broccoli, green beans, wilted spinach, or any other green vegetable are also good!)
Fresh gnocchi (or pasta, mashed or roasted potatoes, or chips)


Method

Soak your dried morel mushrooms in a bowl with warm water for around twenty minutes to allow them to re-hydrate. Reserve the soaking fluid (which takes a lovely musky flavour from the morels) as it may be useful for thinning the sauce later on.


Heat a mixture of cooking oil and butter over a high heat and add your chicken breasts - the oil provides the high temperature needed to brown the meat (butter alone would burn) while the butter adds flavour.
After searing the chicken breasts until golden on both sides, reduce to a medium heat and continue to cook for another 8 minutes or so until the chicken is cooked through (you may want to make an exploratory cut in one of the breasts to check it's not pink).

Steam the asparagus for 4 or 5 minutes and cook the gnocchi according to the instructions on the packet.


Chop the morel mushrooms and add to the pan with the chicken. Add a dash of white wine and 100ml (give or take) of single cream and simmer for a minute or so until everything is heated through. If the sauce is too thick, add a splash of the liquid which was used to soak the dried morels.


Sprinkle in some grated Parmesan and lots of freshly ground black pepper, then plate everything up. Drizzle the sauce over the chicken breasts and gnocchi, and - if you want - sprinkle some more Parmesan over your asparagus (and maybe a knob of butter too!).

Wednesday, 6 March 2013

Ultimate fish pie

Fish pie is my boyfriend's favourite meal, but for some reason my previous attempts have never been as successful as I could have hoped: too dry, too saucy...the issues have varied, but most recently I have had a losing streak of soggy mashed potatoes.


This time, I decided to up my game and - in an attempt to make the ultimate fish pie - combined two popular recipes (J Sheeky's version and the "Luxury Fish Pie" recipe from the BBC website) with a few extra additions of my own.


The result? A delicious blend of smoked haddock, salmon, white fish and king prawns - not forgetting the all-important hard-boiled eggs - in a creamy, flavourful white sauce, topped with smooth mashed potato and a bubbling layer of melted cheese. Success at last!

Ingredients

For the white sauce
50g butter
50g plain flour
250ml milk
250ml fish stock
50ml white wine
100ml double cream
1 teaspoon English mustard
Squeeze lemon juice
Salt and freshly ground black pepper

For the filling
250g skinless, boneless cod fillet, cut into chunks
250g skinless, boneless salmon fillet, cut into chunks
250g skinless, boneless smoked haddock fillet, cut into chunks
150g raw king prawns (de-shelled)
4 eggs, boiled and chopped into eighths

For the topping
1kg floury potatoes
A knob of butter
A dash of milk
Salt (to taste)
150g of cheddar cheese, grated


Method

Potatoes

First, prepare your potatoes. I like to do this stage in advance, and leave the mash to cool before I use it, as it makes it easier to work with when I'm layering everything into the pie dish.

Prick your baking potatoes all over with a fork and bake in a 200C oven for around 1 hour and 15 minutes. Remove from the oven, slice in two, and scoop the fluffy insides into a large mixing bowl. Retain the 'jackets' and use to make filled potato skins (with bacon and cheese - delicious).

Mash the potato with a knob of butter and a dash of milk, and season with salt. Warning: don't add too much milk or your mash will get too runny when you cook your pie!

Filling

Prepare your fish by cutting the fillets into fairly large (around 1-inch square) chunks. Heat the fish stock and white wine to a simmer in a large saucepan and poach the fish for two minutes. Drain the fish over a bowl, reserving the poaching liquid for the white sauce.

Meanwhile, boil the eggs for around 10 minutes. When they're done, run them under cold water, peel, and cut into eighths. Layer everything into a large dish and top with the prawns.

Sauce

To make your white sauce, melt 50g of butter in a heavy based saucepan over a medium heat, and stir in the flour to make a roux. Add the milk and poaching liquid (i.e. fish stock and white wine) a bit at a time, stirring continuously until the sauce thickens.

Remove the pan from the heat, and add the mustard, double cream, and squeeze of lemon juice. Season generously with salt and freshly ground black pepper, and pour into the pie dish over your fish and hard-boiled egg layer.

Topping

You're now ready to add the mashed potato layer. I find it easiest to mould handfuls of cold mashed potato into flat 'tiles' and place on top of the pie filling. This helps ensure a smooth and even coverage.

Sprinkle generously with cheese and place in a pre-heated oven at 200C for around 40 minutes or until the filling is piping hot and the cheese is golden and bubbly.

Serve with steamed sugar snap peas or tenderstem broccoli.

Monday, 4 March 2013

An American feast: slow-cooked BBQ beef 'brisket'

I'd been nursing an unsatisfied craving for BBQ ever since our failed attempt to get into Pitt Cue, so when I was hosting a dinner party the other week I decided to give it an American theme. The piece de resistance was a huge roasting tin of slow-cooked BBQ beef...


It was surprisingly easy to make, and a great excuse to play with my slow-cooker - I set it up to cook for 8 hours while I was at work, then finished the meat off in the oven before the guests arrived that night. I had planned to use brisket, but was forced to settle for topside, a much leaner cut: while I had worried it might turn out a bit dry, it was actually perfectly delicious (and probably a bit healthier too, as an added bonus!).

I found this recipe on-line and made a few tweaks to suit the size of my beef joint, the contents of my store cupboard, and my own personal preferences! See my version below:

Ingredients

2kg topside of beef
2 onions, cut into eighths
6 garlic cloves, crushed
2 tbsp tomato puree
200ml white wine vinegar
150ml orange juice
A few cloves
2 tbsp demerara sugar
2 tbsp runny honey
600ml passata
300ml good quality beef stock
Salt and freshly ground black pepper
(If you like your BBQ spicy, add two finely chopped, deseeded red chilli peppers)

Method

Cut the beef into three or four big chunks (so that it will fit into the slow-cooker) and brown on all sides in a frying pan on a high heat. Add the browned meat to the slow-cooker with all the other ingredients listed above, and set to cook for 8 hours (or whatever the maximum setting is on your slow-cooker - the longer it cooks, the better).

8 hours later, remove the meat from the liquid with tongs and transfer to a large roasting tin. Strain the sauce to remove the onion pieces, and reserve. Shred the chunks of beef roughly with a fork, douse with a few ladlefuls of strained sauce, and place on the bottom shelf of a 200C oven.
Cook for an hour or so, removing every 15-20 minutes to cover with ladlefuls of sauce (to keep everything moist). With cooking, the sauce - fairly liquid initially - will thicken into a delicious glossy glaze. Towards the end of the cooking process, tear your meat into finer shreds to achieve the traditional 'pulled' texture (you will want to keep the meat in larger pieces to start with so that it doesn't dry out too much).

Serve in soft rolls, with a mound of sweet potato wedges on the side and perhaps a spoonful or two of BBQ beans. Delicious!

This recipe was a big success, and is something I will definitely be making again: while I massively over-provided food-wise (we were left with a huge bowl of BBQ beans, an untouched roast chicken, and half a tray of brownies) there was only a tiny spec of beef left...and this was quickly gobbled up by my boyfriend the next morning as part of a "cowboy" breakfast (fried eggs, toast, beans and BBQ beef).

Sunday, 10 February 2013

Lasagne soup

I love lasagne, but it's not something I usually have time to make after a full day at work...


...so when I saw this lasagne soup on Sweet Basil, I knew I had to give it a try. Meaty, tomato-ey, and packed with chunks of melting mozzarella, this quick, no-fuss recipe is a great way of satisfying your craving without spending hours in the kitchen.

The concept is pretty simple - make a basic Bolognese sauce (beef mince, tomato passata, maybe some red wine), throw in some pasta (most recipes call for broken up sheets of lasagne - I didn't have any left, so I used fresh tortellini instead), and finish everything off with chunks of fresh mozzarella and a heavy dusting of Parmesan. Delicious.

My version is quite different from the original, and if you have your own tried-and-tested recipe for Bolognese, feel free to substitute it in to the recipe below.

Ingredients (makes two huge bowls, or four smaller ones)

1 lb of extra lean beef mince
700g tomato passata
2 garlic cloves, crushed
Handful of basil leaves, roughly shredded
1tbsp tomato puree
A few glugs of red wine
Hot water, to thin out the sauce
Salt and pepper to taste
Half a packet of fresh tortellini (OR a few sheets of dried lasagne, broken into pieces)
1 ball mozzarella cheese, cut into chunks
Parmesan and more basil leaves, to serve


Fry your mince in a large frying pan. Depending on the size of the pan, it may be best to do this in batches to allow the meat to brown properly. Meanwhile, add tomato passata, crushed garlic, basil leaves, tomato puree and red wine to a large saucepan, and bring to a simmer. Once browned, add your mince to the tomato sauce, and cook everything together on a medium-low heat for about 15 minutes.


Season your sauce with salt and pepper to taste, and add the tortellini. The sauce should be liquid enough to cover the pasta - if not, add some hot water to make it more 'soupy'. Leave everything to simmer for another 4 minutes or so (depending on the cooking instructions for the tortellini), before stirring in three quarters of your mozzarella cubes.

Divide the lasagne soup into bowls, and scatter with the remaining mozzarella, more shredded basil, and a good sprinkling of Parmesan cheese. Serve and enjoy!

Monday, 28 January 2013

Smoked salmon, prawn and courgette frittata

A frittata is a great way of transforming your leftovers into a filling and delicious meal, and last week - with smoked salmon trimmings and king prawns left over from my seafood crepes and half a courgette languishing in my vegetable drawer - it seemed like the obvious choice for an easy weeknight supper.


The best thing about a frittata is that you really can use anything you want: switch the courgette for asparagus or broccoli; swap the salmon and prawns for bacon or ham...or if you fancy something more traditional, combine chorizo, leftover new potatoes, onions, and red and green peppers to create a delicious Spanish omelette.

Ingredients

4 eggs, beaten
Smoked salmon trimmings
King prawns
Half a courgette, sliced into rounds
Black pepper
Butter (for frying)


Beat the eggs in a bowl and stir in the smoked salmon trimmings. Slice the courgette into rounds of roughly the same thickness as a one pound coin. Add the prawns and courgette to the egg and salmon mixture, and season generously with black pepper.


Melt butter in a large frying pan, add your frittata mixture, and cook on a medium heat until it begins to set. If you're brave, you can try to flip it...otherwise finish it off under the grill.


Et voila! Your leftovers have been reincarnated as dinner...

Tuesday, 22 January 2013

Lazy seafood crepes (with smoked salmon and king prawns)

If you love fish pie, but can't face the effort involved (white sauce, mashed potatoes, 30 minutes in the oven - I'm exhausted just thinking about it...) these lazy seafood crepes could be just the thing for you. They couldn't be easier to make but still come off as an impressive and inventive dish, and they are equally suitable for a relaxed dinner party as for a weeknight supper.


Ingredients

8 ready-made crepes (make sure they are plain!)
200g king prawns
200g smoked salmon trimmings
150ml or so of single cream
Parmesan cheese, grated
Freshly ground black pepper
Optional: Finely chopped dill, juice of half a lemon

Pre-heat your oven to 180C.

In a small mixing bowl combine the smoked salmon trimmings with most of the single cream (reserving 30ml or so), and stir well.

Place a crepe on the bottom of a circular oven-proof dish and top with a thin layer of the salmon and cream mixture. Dot a few king prawns over the surface, and season with a decent helping of black pepper.

Repeat these layers (crepe-salmon-prawn) until you have used up all your salmon/cream mixture. Top with a final crepe, drizzle over the remaining single cream and sprinkle with grated parmesan.


About to go in the oven...


Place your dish on the top shelf of your pre-heated oven and cook until everything is heated through (this should take around 15-20 minutes - the top should be golden and the cream should be bubbling up at the edge of the dish).

Serve sliced into wedges, alongside steamed asparagus or a side salad.


Saturday, 12 January 2013

Tasty chicken in satay sauce

I had planned on making chicken satay yesterday evening, but arriving home late after a cold and dark walk back from the office, I couldn't face fussing around with skewers and marinades (nor the 20 minute wait for the chicken to cook in the oven...). I already had all the ingredients I needed for my satay, so I decided to have a go at re-creating an Indonesian dish I tried years ago; a simple but delicious meal of chicken cooked in a spiced peanut sauce.


I didn't really follow a recipe for the satay sauce - I've made it enough times in the past (usually using Jamie Oliver's recipe) to know roughly what it should contain, so this time I decided to take the leap and make it according to taste. It turned out even better (in my opinion anyway!) than Jamie's version, and while I didn't really measure things out properly, I've attempted to record the recipe below:

Ingredients

Satay sauce:
4 heaped tablespoons of smooth peanut butter
2 teaspoons of runny honey
2 inch square cube of fresh ginger, grated
3 tablespoons of dark soy sauce
Juice of half a lime
2 cloves of garlic, crushed
(Optional: If you like it spicy, add some finely chopped red chillies)
Water, to thin the sauce

Chicken:
Sesame oil
500g chicken breasts, cut into rough chunks

To serve:
Iceberg lettuce
Rice or noodles
(Tip: if using noodles, add them to the pan with any excess sauce for extra tastiness!)


Method

In a large frying pan, heat your sesame oil and add your chunks of chopped chicken.

Meanwhile, add all the ingredients for the satay sauce to a bowl, and mix together well. Taste and tweak the proportions as you see fit (for example, if you like it sweet, add extra honey; for spice fiends, add chilli...).

Fry the chicken until golden brown, then turn the heat to low and pour the satay sauce into the pan. Add water to thin the sauce to the desired consistency, and stir for a minute or two until the satay sauce is heated through and runny.

Plate up your chicken with iceberg lettuce and rice or noodles. We had noodles, which I added briefly to the pan to mop up the excess satay sauce - yum!

The whole meal took about 15 minutes to make and was actually tastier* than traditional chicken satay, despite the less refined presentation; a warming, comfort-food version of one of my favourite summer-time recipes.


*I was starving, so my judgement may have been skewed!

Sunday, 9 December 2012

Mary Berry's Mega Choc Chip Cookies


Yesterday I decided to make some cookies to take with me to a Christmas party. My boyfriend's mum Jane is a fantastic baker - her signature chocolate cake, a devils food cake with chocolate fudge icing, is the best I've ever tasted (the recipe is from the fantastic Green & Black's Chocolate Recipes - I'll have to do a post about it some time soon!) - so I called her up to get a recommendation.

 
She suggested the mega choc chip cookies from Mary Berry's Ultimate Cake Book:


Ingredients

175g (6oz) margarine
225g (8oz) caster sugar
2 eggs
350g (12oz) self-raising flour
100g (4oz) chocolate chips (I double this, and used 100g each of milk and white chocolate chunks)


I love my Joseph Joseph nesting bowls set :)


These really couldn't be any simpler to make: after measuring out your ingredients you just throw everything together in a bowl and mix it all up into a smooth cookie dough.


 Chocolate chunk time!

Grease a couple of baking trays (I only have one, so I made the cookies in two batches) and scoop blobs of the dough onto the trays, flattening slightly with the back of a spoon. Make sure they are quite widely spaced as the cookies will expand a lot when you bake them.

 Not spaced quite wide enough....


 Cook in a pre-heated oven at 180C for about 10-15 minutes, until golden-brown but still slightly soft, then place on a wire rack to cool (or dig in - it's up to you!).


 All done! Now you can lick out your bowl...


Jane's top tips for a perfect cookie:

  • Don't skimp on the sugar: it may seem like a lot, but it doesn't make the cookies overly sweet; it just gives them a lovely caramel chewiness at the edges
  • Make sure you flatten the blobs of dough: if you make the cookies too thick they will turn into short-bread 
  • Use chocolate chunks rather than chips, the bigger the better (Waitrose sell them in their baking section)
  • Use a dessert spoon to measure out your dough for perfect-sized cookies
  • For something a bit different, add chunks of fudge along with the chocolate chips
  • Even if you do have enough trays, it's a good idea to bake in a couple of batches: all ovens differ and it may take a bit of experimenting to find the right cooking time for the perfect chewy consistency
 And one from me:
  • Place the cookie dough in the fridge for a while before you spoon it onto the baking trays - this will make the dough a bit less sticky and easier to work with (my first batch kept sticking to the spoon when I tried to flatten them!)
  • Go crazy with the chocolate chips. The original recipe recommends only 100g - I used 200g, and to be honest, I think they could possibly even have done with a few more than this!
These are English-style cookies - soft with a slight toffee crispiness at the edges - rather than the chunkier American variety. As far as I can tell, the main difference lies in the type of sugar you use: most US versions seem to use a combination of brown and granulated sugar, whereas the caster sugar in Mary Berry's version produces cookies with a finer texture.


For extra brownie points, make your own gift box

Stored in an air tight container, they should keep* for a couple of days, and would make a lovely home-made Christmas gift - simply pop them into a glass jar and tie on a festive ribbon for an easy but thoughtful present. I took mine to the party in a decorated shoebox, and they disappeared pretty quickly!


*I didn't get the opportunity to test this with my batch!

Thursday, 8 November 2012

Slow roast lamb with chickpea and pomegranate salad


Inspired by my meal at Kopapa, I decided to have a go at my own slow-cooked lamb dish. Slathered in a pomegranate molasses marinade, and roasted until it fell from the bone in tender chunks of caramelised meat, this went perfectly with a chickpea and pomegranate dish (roughly based on a recipe from my mother's Moro cookbook) and a refreshing salad of cucumber, pomegranate seeds, fresh coriander and lime juice.


Pomegranate Molasses Lamb

Ingredients

Shoulder of lamb
Pomegranate molasses
Garlic cloves (optional)

Place the lamb in a large dish, and drizzle generously with pomegranate molasses. Massage the molasses into the lamb, using as much as you need to ensure the meat is well coated. If you want to, cut slits into your lamb (this allows the pomegranate molasses to penetrate the meat), and place a clove of peeled garlic into each slit.

Leave your lamb to marinade in the fridge for a few hours, removing 30 minutes or so before cooking in order to bring the meat back to room temperature. Alternatively, if you're strapped for time, you can simply marinade the lamb for 15 minutes while the oven is heating up (this is what I did, and it didn't seem to have a particularly adverse affect on my finished dish!).


Preheat the oven to 150C. Transfer the lamb to a roasting dish, pouring over the pomegranate molasses marinade (and adding more as needed - I think I used about twice as much as was recommended by any recipe...which probably helped make up for my shorter marinading time). Add 100ml or so of water to the roasting tin, and cover with silver foil.

A 1kg joint of lamb should be cooked at 150C for 3 hours. For each additional 500g of meat, extend the cooking time by 20 minutes. [E.g. a 2kg joint would require 3 hours and 40 minutes.]
Remove your lamb from the oven, discarding the silver foil, and pour off any juices into a seperate bowl. Other recipes recommend that you leave the juices to cool for half an hour before skimming off any fat, and returning them to the roasting tin.

If you don't want to wait for half an hour, you can do what I did: pour off any grease (and remove any large chunks of fat from the surface of your lamb). Then add more pomegranate molasses and a dash more water to the roasting tin, before returning the lamb (uncovered this time) to the oven.

Turn the temperature up to 190C, and cook until the meat is nicely caramelised (around 30 minutes). Upon removing the lamb from the oven, stand for a few minutes to cool, before tearing into rough chunks with two forks (OK, or your fingers), and serving.


Chickpea and pomegranate salad

Ingredients

250 grams dried chickpeas
Olive oil
3 garlic cloves, thinly sliced
3 Tbsp pomegranate molasses
200 ml boiling water
One chicken stock cube (optional)
A few threads of saffron, infused in boiling water (according to instructions on packet)
Seeds of 1 large pomegranate
Handful of fresh coriander, chopped
Salt and pepper, to taste


Begin the day before, by soaking the chickpeas overnight in cold water. (If you don't have time to do this, you can always used canned chickpeas, but the dried ones are much nicer!). Rinse thoroughly, and prepare according to the instructions on the packet - I boiled mine for about an hour and a half, until tender.

Infuse a few strands of saffron in a tea cup with some boiling water. Meanwhile, heat the olive oil in a saucepan and briefly fry the sliced garlic* before adding the drained chickpeas and pomegranate molasses. Add the 200ml of boiling water, the stock cube (if using - this isn't in the original recipe, but I think it adds flavour) and the saffron-infused water to your pan, and simmer gently for ten minutes or so, until you are left with just a small amount of flavourful sauce.

Use the ten minutes cooking time to de-seed your pomegranate. This is my least favourite part of the cooking process - not only is it quite time consuming, but I am incapable of extracting the seeds without covering myself (and everything else in my kitchen) with brightly-coloured juice**.


Cucumber and pomegranate salad

Ingredients

1 cucumber
Seeds of 1/2 pomegranate
Handful of fresh coriander, chopped
Squeeze of lime juice
Salt and pepper, to taste


Cut the cucumber into two lengthways and use a dessert spoon to scoop out the juicy seeded centre. Discard (or eat...) as this will make your salad too watery. Roughly dice the remaining cucumber, and place the chunks into a bowl. Add the seeds of half a pomegranate (more tedious de-seeding required!), the juice of one small lime, and chopped fresh coriander. Season to taste, and serve.

Serve the three dishes together, alongside a pile of flatbreads or toasted pittas and an assortment of dips (hummus, baba ganoush, tzatziki...) for an impressive Middle Eastern feast.


*Be careful not to let your garlic get too brown, as it will develop an unpleasant acrid taste.
**I've actually started de-seeding pomegranates in my underwear - not because I am some sort of sensual domestic goddess, a la Nigella...but because I've ruined too many tops with spatters of pomegranate juice.

Sunday, 28 October 2012

Steak with porcini mushroom cream sauce and pommes dauphinoise

For the main course of my home-cooked anniversary dinner, I had wanted to make steak aux morilles. This was one of my favourite dishes during my two-year stint in Geneva, when my family made regular trips to a nearby bistro to devour juicy steaks topped with this rich, creamy mushroom sauce.

Morel mushrooms are wrinkled and hollow with an incredible flavour: earthy, musky and delicious, they work fantastically with meat and in creamy gravies, and are capable of elevating a traditional mushroom sauce to something quite special.

Unfortunately, it was almost impossible to find anywhere I could buy these in the UK (I naively thought they may have some in Waitrose), and a quick look on the internet sees dried morels being sold for upwards of £60! So, I decided to go with porcini mushrooms instead.

For the steak and mushroom sauce:

Ingredients

2 good quality steaks (I used fillet steak)
Generous handful of dried porcini mushrooms (or dried morels, if you can find/afford them!)
Single cream, around 150ml

Begin by placing the dried porcini mushrooms in a bowl, and covering with boiling water from the kettle. Leave to steep for around 20 minutes. 

Meanwhile, heat a griddle pan with a splash of cooking oil until extremely hot (if you're unsure, add a tiny fleck of meat - it should sizzle up immediately). Add the steaks and cook according to instructions on the packet, and preference. It's usually around eight minutes (four on each side) for a rare steak, but this will of course vary with the thickness of the meat!

Remove from the pan and plate up - you can leave the steaks for a minute or two while you make your sauce without any ill effects to the taste.

Drain the water from the porcini mushrooms (note: if you're making a risotto or a stew, reserve the steeping liquid and add it to your dish, as it picks up a really good flavour from the mushrooms). Using the same pan as you did for the steak, add the soaked mushrooms, a knob of butter, and your cream. 

Turn the heat right down, and stir until the cream sauce has picked up all the delicious meaty residue from the bottom of the pan and your mushrooms are heated through. Pour the sauce over the meat, and serve.

Alongside the steak and mushroom sauce we had brussels sprouts (steamed for around five minutes until al dente) and dauphinoise potatoes.


I have to admit, while not a fan of ready meals in general, I've always been happy to cheat with dauphinoise potatoes: they're a perfect side for a meat and two veg style meal (a bit more interesting than plain old spuds), but far too fiddly to make from scratch on a weeknight. So, with no prior experience of making this dish, I was a bit apprehensive at how it would turn out (and how difficult it might be!)

I made a huge portion, and still have a couple of individual servings in my freezer (to be used in the place of the ready meal variety in the future).

Ingredients

1kg baking potatoes
2 cloves of garlic
150ml single cream (plus extra as needed)
250ml double cream
Salt and pepper, to taste
Optional: Gruyere cheese (for a melted cheese topping), or parmesan - I chose not to use any cheese as I felt it would be overkill after my cheesy souffle starter.

Start by peeling your potatoes, and slicing them into rounds of roughly the same thickness as a £1 coin. Place your potato slices into a colander, rinse thoroughly with cold water, and pat dry on a tea towel.

In a jug, measure out your single and double cream, and add the grated garlic cloves and plenty of salt and pepper. Stir to combine.

Lightly butter an oven-proof dish, and cover the bottom with an overlapping layer of potato slices. Season with salt and pepper, and cover with some of the cream mixture. Repeat this process until you run out of potato rounds, alternating layers of potato with the cream mixture. 

Make sure the top layer of potatoes is fully covered in cream. This is especially important if you are not putting in the oven immediately, as raw potatoes quickly start to go grey when left in the air. Covering them with cream gives you an hour or two's grace and allows you to get on with the rest of your cooking in the meantime.

When you're ready, place you dish near the top of a pre-heated oven at 160C (140C for a fan oven) and bake for around 90 minutes (or until the potatoes are soft), checking periodically that the top is not burning. If it starts to get too brown, cover with a layer of tin foil for the remainder of the cooking period.

Stand to cool for around 10 minutes before serving (straight from the oven, this will be extremely hot). You should aim to take the dauphinoise potatoes out to cool at around the same time as you begin cooking your steak.


So, there you go: a fairly decent attempt at a traditional french meal. Unfortunately mushroom sauce and creamy potatoes aren't the most compelling photo subject...but I promise, it tasted a lot better than it looks!!!

Thursday, 18 October 2012

A fancy french dinner for a special occasion

Five years ago last Tuesday, my boyfriend and I 'officially' started going out*. To celebrate having put up with each other for so long, and to distract from how tragically old this made us (read: me) feel, I decided to prepare a special dinner to mark the occasion.


Anniversary flowers

Occasions like this are the perfect opportunity to try something new in the kitchen - with just the two of us, there's less pressure than a dinner party, both in terms of scale, and expectations (after five years the relationship is unlikely to suffer excessively from a culinary mishap or two!) - so with that in mind, I decided to try a few new things.

Anniversary champagne

I chose a 'french-ish' theme for the menu, although this was derailed somewhat by my boyfriend's insistence that we have banoffee pie for dessert**.

Menu

Frisee salad with cheese, sliced pear, and caramelised pecans
Double swiss souffles
Steak with a cream and porcini mushroom sauce, potatoes dauphinoise, and brussel sprouts
Banoffee pie

Given the number of recipes involved, I'll split this post into three. So, to begin at the beginning, let's talk about the starters:


The frisee salad was relatively simple to make. Aside from caramelising the pecans and mixing up a vinaigrette, it really only involved layering everything onto a plate.


Ingredients

1 pear (this should be ripe - mine wasn't)
Cheese (something which goes well with pears - most recipes call for blue cheese, if you're into that!)
Frisee salad leaves
Caramelised pecans
Grain mustard vinaigrette

I was a bit disappointed in the cheese - I bought it from a stall at Borough Market over the weekend, and had specifically asked the man on the counter for something that would go well with pears, but it wasn’t quite right. I'm not sure what it was actually called, but it was a hard cow’s milk cheese, quite strong and salty; somewhere between gruyere and pecorino.

The caramelised pecans were a bit more successful, adding a pleasant sweetness to the salad. They were especially lovely when included in a mouthful with pear, salad leaves, and grain mustard vinaigrette.


Caramelised pecans, cooling on their foil - yum!

Ingredients
(Note: this makes waaay more pecans than you need for the salad - but the leftovers are pretty tasty!)

250g pecans
25g butter
50g sugar

Add the butter, sugar and pecans to a saucepan, and heat until the caramel is smooth (that is, when all the sugar is fully dissolved) and has taken on a rich brown colour. Spread the caramelised pecans onto a layer of tin foil to cool, then store in a airtight container in the fridge until ready to use.

These seem to keep pretty well - I made them the day before my salad, and took the leftovers in to work the day after that, and there was no noticeable deterioration in texture or taste.

I went with a grain mustard vinaigrette, but this would probably also be nice with a sweeter dressing - I saw some pear salad recipes which used maple syrup in their vinaigrette, which could be nice.

Ingredients

Grain mustard
Good olive oil (extra Virgin)
White wine vinegar (substitute this with lemon juice if you prefer)

Mix a heaped teaspoon of grain mustard with equal parts olive oil and vinegar. Whisk together with a fork, and you're done.

To assemble your salad, start with a layer of frisee salad leaves. Top with slices of pear and  cheese, sprinkle with the caramelised pecans, and drizzle with vinaigrette.

This is a simple starter: it's not too filling, and served nicely as something to whet the appetite before the cream fest to come (what with the souffles, dauphinoise potatoes, and bannoffee pie, I used a LOT of cream in this meal!)


The double swiss souffles were the stars of the show. I have had these once before in a restaurant, and loved them, but have always been too scared to attempt a souffle myself, let alone a 'double' souffle...In fact they were laughably simple to make:

I used the recipe from Mary Berry's Complete Cookbook***. It's worth reading it through before you start, as everything needs to be done at once, so it definitely helps to have done some preparation before you put make the roux!

Ingredients 
(Note: the original recipe serves six, so I scaled it down to serve the two of us)

15g butter, plus extra for greasing
15g plain flour
100ml milk
20g Gruyere cheese, grated (I used the leftover cheese from my salad)
1 egg, seperated
20g grated parmesan
100ml double cream

You will also need: 2 ramekins, a small roasting tin (to serve as a bain marie) and a shallow oven proof dish.

Step 1: Melt the butter in a non-stick saucepan, add the flour, and stir together for one minute. Remove from the heat and gradually blend in the milk, before returning to the heat and bringing the mixture to the boil, stirring until it thickens.

Step 2: Remove the pan from the heat and stir in the grated Gruyere cheese and the egg yolks (make sure you stir quickly so the egg yolk doesn't start to cook!)

Step 3: Whisk the egg white until it forms stiff peaks. Stir 1 tbsp into the mixture, before folding in the rest.

Step 4: Generously butter two ramekins, and divide the mixture between them. Place the ramekins into your small roasting tin and pour boiling water into the tin until it comes half way up the sides of the ramekins.

Step 5: Bake the souffles in a pre-heated oven at 220C (200C if you have a fan oven) for 15-20 minutes until golden and springy to the touch (mine were done after 15 minutes). Leave the souffles to stand for 5-10 minutes; they will shrink by about one third. (I left mine for 5 minutes, because I'm impatient!)

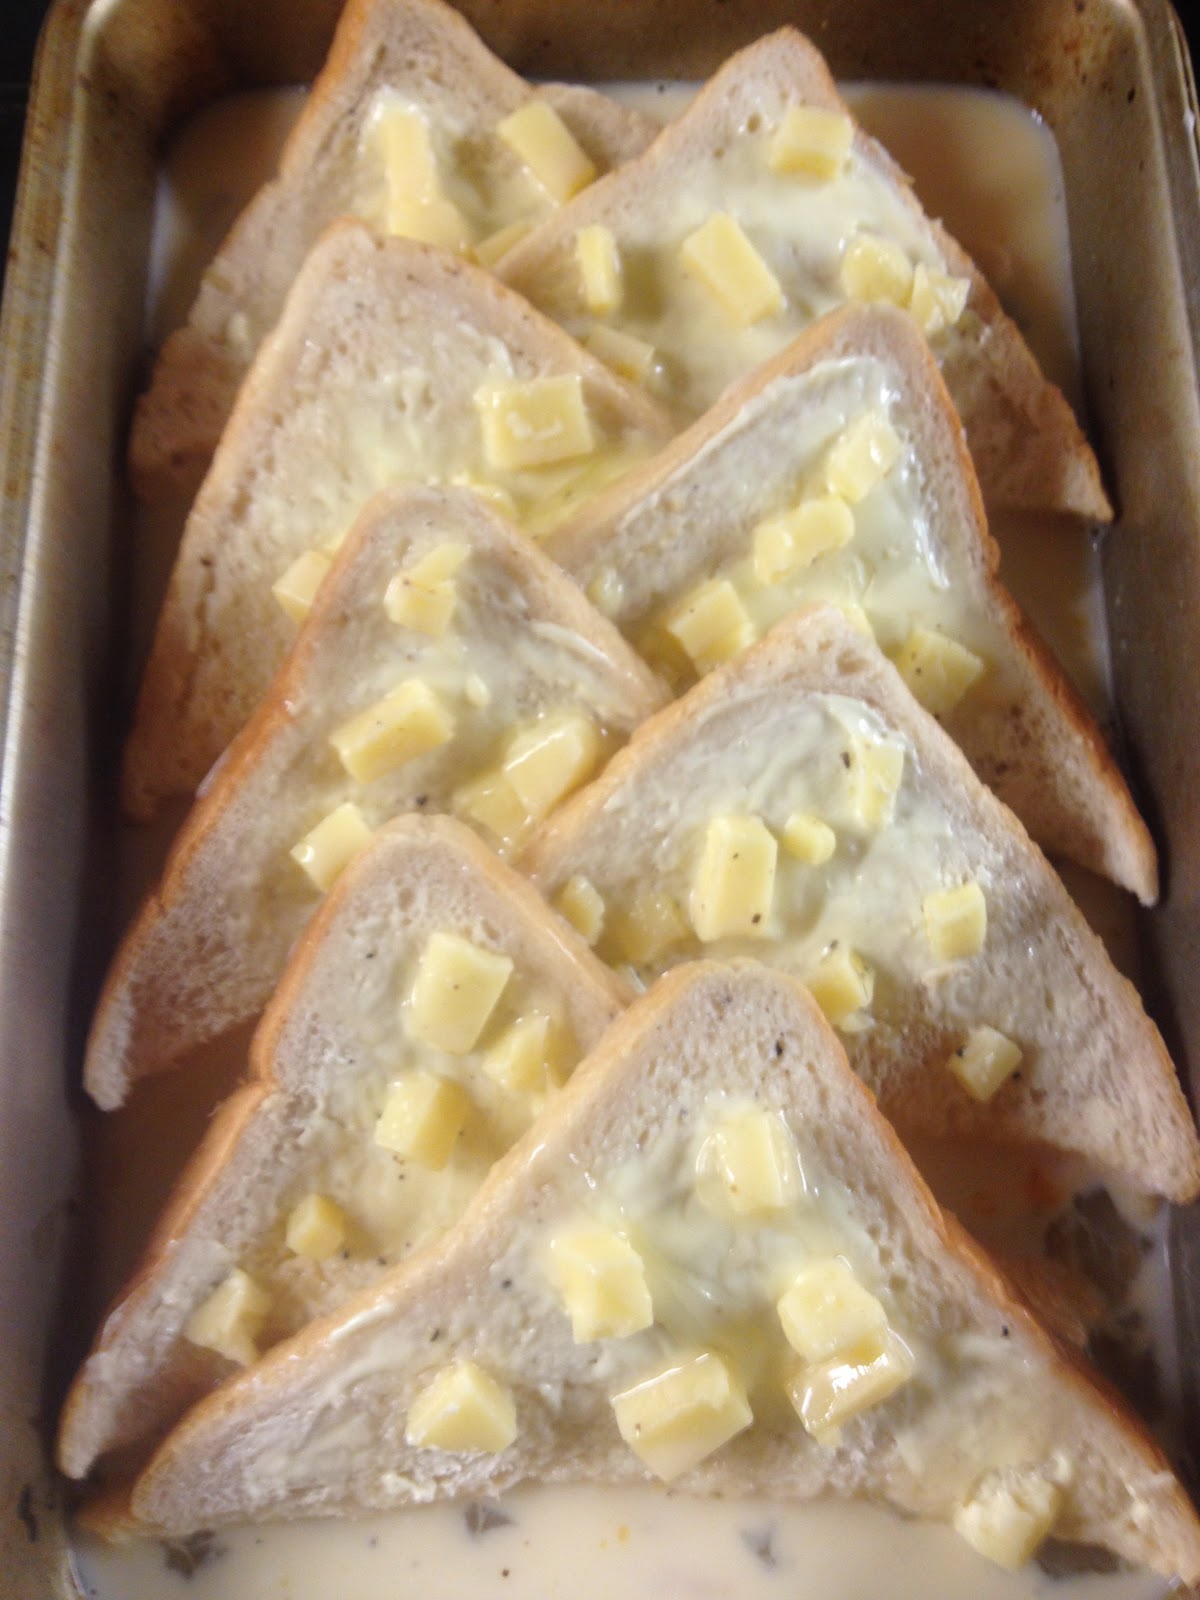
Step 6: Butter your shallow oven proof dish. Sprinkle half your parmesan cheese over the bottom of the dish. Run a knife around the edge of each souffle, then carefully un-mould them onto the parmesan layer.

Step 7: Season the double cream with salt and pepper, and pour over the souffles. (Note: if your dish is too large, you may need extra cream to cover the bottom. I topped mine up with some single cream, just to stop everything from drying out. If you're making six souffles with 300ml cream, this probably won't be a problem) Sprinkle the remaining parmesan over the top and return to the oven for 15-20 minutes until golden.

Mary Berry serves her souffles garnished with chopped chives: my boyfriend hates them, so I missed this step out.

OK - so one of them collapsed a little. Still, not bad for a first attempt!

So - there were my starters! Recipes for main course and dessert to come...

 *we were 18, so by official, I of course mean "facebook official". If it's not on facebook, it doesn't count...

**disappointingly, as my addiction to The Great British Bake Off has had me itching to try my hand at choux pastry

***This really is a fantastic cookbook: with almost 500 pages of recipes, it covers a huge array of different dishes, and is incredibly handy to have on your kitchen shelf!